Wednesday, October 19, 2011
The Debian Administrator's Handbook
The Debian Administrator's Handbook is the title of the translation of the French best-seller known as Cahier de l'admin Debian. Written by two Debian developers—Raphaël Hertzog and Roland Mas —it's a fantastic resource for all users of a Debian-based distribution. It's first edition in 2004 was completely sold out in barely four months. A second edition followed soon after with the addition of a few sections as suggested by the first readers of the book. Right from the third edition, Roland Mas – who had proofread the book since the beginning – joined Raphaël Hertzog.
Given that traditional editors did not want to take the risk to make this translation, the two Debian developers decided to do the translation themselves and to self-publish the result.
They have two targets :
(1) a first target (15000 EUR) that is really the strict minimum that they need to make the project happen. If they reach this target but not the second one, the book will only be available on a commercial and proprietary basis.
(2)a second target: 25000 EUR in the liberation fund : If this target is reached, the book will be published under 2 free licenses (CC-BY-SA 3.0 and GPL2+).
Read all about it : http://debian-handbook.info/
Speak it out : http://www.ulule.com/debian-handbook/promote/
Thursday, October 6, 2011
Access Your Delicious Bookmarks Old Style
Delicious is a social bookmarking service for saving, sharing, and discovering web bookmarks. Started in 2003 and acquired by Yahoo! in 2005, Delicious has built a worldwide community of millions of users. In 2011, Delicious was acquired by the founders of YouTube, Chad Hurley and Steve Chen. Delicious is part of AVOS, a new Internet company based in San Mateo, California. And on September 27, 2011 their new website was launched : http://www.avos.com/new-delicious/.
After acquiring the service from Yahoo! in April, we realized that in order to keep innovating over the long term, the eight-year-old site needed to be rebuilt from the ground up. The result is a new homepage, interface and back-end architecture designed to make Delicious easier to use.
Nice said but I think the new interface sucks....and I'm not the only one : http://gigaom.com/2011/09/28/oh-delicious-where-did-it-all-go-so-wrong/.
One of my two accounts was completely lost, despite opting in to the new terms.
But luckily there is a way to have access to the old Delicious even if your account seems to be deleted !
What you need to do is to add these lines to your hosts file ( /etc/hosts ) :
98.139.50.166 www.delicious.com
76.13.6.190 secure.delicious.com
76.13.6.209 static.delicious.com
and restart your browser....
If you go to http://www.delicious.com/ you will see the old style Delicious page :
Her I could login with my lost account and export my bookmarks with all the tags and notes ( Settings > Export / Backup Bookmarks ) :
Try it while you still can....
Note : http://delicious.com/ will bring you to the new Delicious webpage....
Some nice alternatives :
Diigo : http://www.diigo.com/
Pinboard : http://pinboard.in/
After acquiring the service from Yahoo! in April, we realized that in order to keep innovating over the long term, the eight-year-old site needed to be rebuilt from the ground up. The result is a new homepage, interface and back-end architecture designed to make Delicious easier to use.
Nice said but I think the new interface sucks....and I'm not the only one : http://gigaom.com/2011/09/28/oh-delicious-where-did-it-all-go-so-wrong/.
One of my two accounts was completely lost, despite opting in to the new terms.
But luckily there is a way to have access to the old Delicious even if your account seems to be deleted !
What you need to do is to add these lines to your hosts file ( /etc/hosts ) :
98.139.50.166 www.delicious.com
76.13.6.190 secure.delicious.com
76.13.6.209 static.delicious.com
and restart your browser....
If you go to http://www.delicious.com/ you will see the old style Delicious page :
Her I could login with my lost account and export my bookmarks with all the tags and notes ( Settings > Export / Backup Bookmarks ) :
Try it while you still can....
Note : http://delicious.com/ will bring you to the new Delicious webpage....
Some nice alternatives :
Diigo : http://www.diigo.com/
Pinboard : http://pinboard.in/
Wednesday, September 14, 2011
Create Separate Profiles in Google Chrome, Chromium Browser and Iron.
Iceweasel and firefox come with a profilemanager which can be started with the -P switch :
e.g. for iceweasel :
iceweasel -P
You can always start a new window of Google Chrome, Chromium Browser and Iron in private or incognito mode ( which is a special, different profile : http://www.google.com/support/chrome/bin/answer.py?answer=95464&hl=en-US) with the keyboard shortcuts Ctrl+Shift+N.
As explained here, the default directory of the profile is located at:
Google Chrome : ~/.config/google-chrome/Default
Chromium and Iron : ~/.config/chromium/Default
To make more permanent profiles we can do it manually. Let's take Google Chrome as an example :
Open up a terminal and type in the following :
/usr/bin/google-chrome --user-data-dir=".config/google-chrome/NewProfile", where NewProfile is just the name of the new profile.
This will start Google Chrome with a new, freshly created profile :
If you want to create a different profile but you want all the settings and extensions from the default one just do the following :
( taking Google Chrome as an example again )
create a folder NewProfile inside ~/.config/google-chrome :
cd ~/.config/google-chrome
mkdir NewProfile
and copy the folder Default and the file First Run into the folder NewProfile :
cp -R Default First\ Run NewProfile
Start Google Chrome with the profile NewProfile ( in a new terminal !! ) :
/usr/bin/google-chrome --user-data-dir=".config/google-chrome/NewProfile"
If you don't start a new terminal you will see errors like :
[5728:5728:9257857614:ERROR:CONSOLE(1)] "Uncaught ReferenceError: setShownSections is not defined", source: (1)
[5728:5728:9263544498:ERROR:CONSOLE(1)] "Uncaught ReferenceError: returnExtensionsData is not defined", source: (1)
[5728:5728:9263632214:ERROR:CONSOLE(1)] "Uncaught ReferenceError: returnExtensionsData is not defined", source: (1)
[5728:5728:9263632536:ERROR:CONSOLE(1)] "Uncaught ReferenceError: returnExtensionsData is not defined", source: (1)
and Google Chrome just starts without the settings and extensions of your default profile : I found out that it just start from a folder Default inside ~/.config/google-chrome/.config/google-chrome ( ! )
Now make appropriate entries in the menu : right click Gnome icon in menu > Edit Menus > choose Internet left pane > + New Item in right pane. You will need package alacarte installed.
Note : In newer versions of Google Chrome, you'll be able to enable profiles by navigating to chrome://flags ( Careful, these experiments may bite ! ) and enabling Multiple Profiles. Restart the browser and click the wrench icon > Preferences > Personal Stuff > Users > Add New User. It will start a new window with a new blank profile.
Links :
(1) Iron browser : http://debian-bits-and-snips.blogspot.com/2011/01/srware-iron-browser-of-future.html
http://debian-bits-and-snips.blogspot.com/2011/01/chromium-browser-and-iron-running-side.html
(2) Google Chrome : http://www.google.com/chrome/index.html?hl=en
(3) List of Chromium Command Line Switches : http://peter.sh/experiments/chromium-command-line-switches/
e.g. for iceweasel :
iceweasel -P
You can always start a new window of Google Chrome, Chromium Browser and Iron in private or incognito mode ( which is a special, different profile : http://www.google.com/support/chrome/bin/answer.py?answer=95464&hl=en-US) with the keyboard shortcuts Ctrl+Shift+N.
As explained here, the default directory of the profile is located at:
Google Chrome : ~/.config/google-chrome/Default
Chromium and Iron : ~/.config/chromium/Default
To make more permanent profiles we can do it manually. Let's take Google Chrome as an example :
Open up a terminal and type in the following :
/usr/bin/google-chrome --user-data-dir=".config/google-chrome/NewProfile", where NewProfile is just the name of the new profile.
This will start Google Chrome with a new, freshly created profile :
If you want to create a different profile but you want all the settings and extensions from the default one just do the following :
( taking Google Chrome as an example again )
create a folder NewProfile inside ~/.config/google-chrome :
cd ~/.config/google-chrome
mkdir NewProfile
and copy the folder Default and the file First Run into the folder NewProfile :
cp -R Default First\ Run NewProfile
Start Google Chrome with the profile NewProfile ( in a new terminal !! ) :
/usr/bin/google-chrome --user-data-dir=".config/google-chrome/NewProfile"
If you don't start a new terminal you will see errors like :
[5728:5728:9257857614:ERROR:CONSOLE(1)] "Uncaught ReferenceError: setShownSections is not defined", source: (1)
[5728:5728:9263544498:ERROR:CONSOLE(1)] "Uncaught ReferenceError: returnExtensionsData is not defined", source: (1)
[5728:5728:9263632214:ERROR:CONSOLE(1)] "Uncaught ReferenceError: returnExtensionsData is not defined", source: (1)
[5728:5728:9263632536:ERROR:CONSOLE(1)] "Uncaught ReferenceError: returnExtensionsData is not defined", source: (1)
and Google Chrome just starts without the settings and extensions of your default profile : I found out that it just start from a folder Default inside ~/.config/google-chrome/.config/google-chrome ( ! )
Now make appropriate entries in the menu : right click Gnome icon in menu > Edit Menus > choose Internet left pane > + New Item in right pane. You will need package alacarte installed.
Note : In newer versions of Google Chrome, you'll be able to enable profiles by navigating to chrome://flags ( Careful, these experiments may bite ! ) and enabling Multiple Profiles. Restart the browser and click the wrench icon > Preferences > Personal Stuff > Users > Add New User. It will start a new window with a new blank profile.
Links :
(1) Iron browser : http://debian-bits-and-snips.blogspot.com/2011/01/srware-iron-browser-of-future.html
http://debian-bits-and-snips.blogspot.com/2011/01/chromium-browser-and-iron-running-side.html
(2) Google Chrome : http://www.google.com/chrome/index.html?hl=en
(3) List of Chromium Command Line Switches : http://peter.sh/experiments/chromium-command-line-switches/
Tuesday, September 6, 2011
Installing Nvidia Driver From Nvidia.com
There are several ways to install the driver for your Nvidia card in Debian.
To find out which videocard you have :
lspci | grep VGA
In my case : 01:00.0 VGA compatible controller: nVidia Corporation G92 [GeForce GT 330] (rev a2)
So my card is a GeForce GT 330.
To get the latest driver just go to this page ( choose Option 1 ) : http://www.nvidia.com/Download/index.aspx?lang=en-us. The latest driver at this moment is Version 280.13 Certified Release Date: 2011.08.01.
Just press the Download and Agree & Download button and the file NVIDIA-Linux-x86_64-280.13.run will be saved ( I use 64 bit ). The NVIDIA graphics driver uses a Unified Driver Architecture: the single graphics driver supports all modern NVIDIA GPUs.
A complete list for all the Unix Drivers is on this page : http://www.nvidia.com/object/unix.html
The NVIDIA graphics driver is bundled in a self-extracting package. You can extract it with :
sh NVIDIA-Linux-x86_64-280.13.run --extract-only
Verifying archive integrity... OK Uncompressing NVIDIA Accelerated Graphics Driver for Linux-x86_64 280.13..............................................................................................................................................
A folder NVIDIA-Linux-x86_64-280.13 is created containing the uncompressed contents of the .run file. On Linux-x86_64, that file contains both the 64-bit driver binaries as well as 32-bit compatibility driver binaries.
Documentation can be found in :
NVIDIA-Linux-x86_64-280.13/html/index.html and
NVIDIA-Linux-x86_64-280.13/README.txt
To be able to install the driver we need first :
apt-get install build-essential linux-headers-$(uname -r )
Before attempting to install the NVIDIA driver you should first disable Nouveau. Nouveau ( http://nouveau.freedesktop.org/wiki/ ) is a display driver for Nvidia GPUs, developed as an open-source project through reverse-engineering of the Nvidia driver. Nouveau performs modesets in the kernel. This can make disabling Nouveau difficult, as the kernel modeset is used to display a framebuffer console, which means that Nouveau will be in use even if X is not running. As long as Nouveau is in use, its kernel module ( nouveau.ko ) cannot be unloaded, which will prevent the Nvidia kernel module from loading. It is therefore important to make sure that Nouveau's kernel modesetting is disabled before installing the Nvidia driver. ( see the README.txt ).
To avoid problems later I start with :
apt-get purge xserver-xorg-video-nouveau
and reboot.
After rebooting do not login and switch to the first virtual (not graphic) terminal by :
Ctrl+Alt+F1
login as root, just enter : root and enter root's password.
Stop the X server by : /etc/init.d/gdm3 stop
Navigate to where you downloaded the driver :
cd /home/$USER/Downloads
sh NV*.run
The .run file is a self-extracting archive. When executed, it extracts the
contents of the archive and runs the contained nvidia-installer utility,
which provides an interactive interface to walk you through the installation.
nvidia-installer will also install itself to /usr/bin/nvidia-installer,
which may be used at some later time to uninstall drivers, auto-download
updated drivers, etc.
Just hit Tab and Enter to accept the license....
Say Yes to :
Install NVIDIA's 32 - bit compatibility OpenGL libraries ? if you run amd64.
Say Yes to :
Would you like to run the nvidia-xconfig utility to automatically update your X configuration file so that the NVIDIA X driver will be used when you restart X ? Any pre-existing X configuration file will be backed up.
A logfile can be found here : /var/log/nvidia-installer.log
The nvidia-installer will also write a file nvidia-installer-disable-nouveau.conf ( /etc/modprobe.d/nvidia-installer-disable-nouveau.conf ) containing these lines :
# generated by nvidia-installer
blacklist nouveau
options nouveau modeset=0
Start the X server again :
/etc/init.d/gdm3 start
Login and check that the nvidia driver is running :
glxinfo | grep rendering
direct rendering: Yes
You can access nvidia-settings in the menu : System > Preferences > NVIDIA X Server Settings that allows adjustment of several additional settings.
For the settings to be loaded on login add :
nvidia-settings --load-config-only
to Startup Applications : System > Preferences > Startup Applications
If this doesn't work make sure you have unchecked Include X Display Names in the Config File in NVIDIA X Server Settings at nvidia-settings Configuration.
Notes :
(1) At the installation you can get a warning like :
No precompiled kernel interface was found to match your kernel; would you like the installer to attempt to download a kernel interface for your kernel from the NVIDIA ftp site (ftp://download.nvidia.com)?
Just answer No and continue.....
or
the installer complains that the gcc version is different from what was used to compile the kernel...
If you know what you are doing and want to ignore the gcc version check, select "No" to continue installation. Otherwise, select "Yes" to abort installation, set the CC environment variable to the name of the compiler used to compile your kernel, and restart installation.
Answer No, but if it fails you can temporarily set the gcc version (to 4.3 for example) by:
export CC=gcc-4.3
before running the Nvidia installer file.
(2) Any kernel update or xserver-xorg-core update will force you to reinstall the driver.
Just use one of the advanced options of the nvidia-installer ( /usr/bin/nvidia-installer ) :
Ctrl+Alt+F1
login as root, just enter : root and enter root's password.
/etc/init.d/gdm3 stop
nvidia-installer --update
If there is a more recent driver available, it will be automatically downloaded and installed.
See also : http://forums.debian.net/viewtopic.php?f=16&t=56833
To see the advanced options of the nvidia-installer just run in a terminal :
nvidia-installer -A
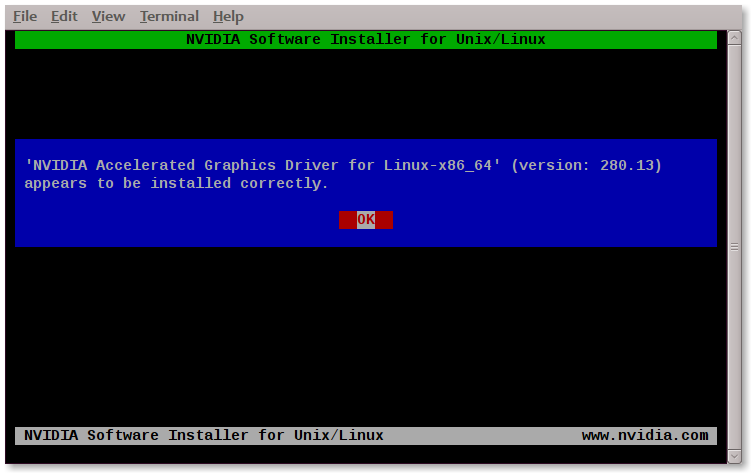
You can always check the current install status to see if it needs to be re-installed:
as root run :
nvidia-installer --sanity
Press OK :
To install the driver for another kernel without uninstalling the driver for the current kernel just boot into the other kernel and install the driver with :
nvidia-installer -K ( K = --kernel-module-only ) :
Install a kernel module only, and do not uninstall the existing driver. This is intended to be used to install kernel modules for additional kernels (in cases where you might boot between several different kernels). To use this option, you must already have a driver installed, and the version of the installed driver must match the version of this kernel module.
To find out which videocard you have :
lspci | grep VGA
In my case : 01:00.0 VGA compatible controller: nVidia Corporation G92 [GeForce GT 330] (rev a2)
So my card is a GeForce GT 330.
To get the latest driver just go to this page ( choose Option 1 ) : http://www.nvidia.com/Download/index.aspx?lang=en-us. The latest driver at this moment is Version 280.13 Certified Release Date: 2011.08.01.
Just press the Download and Agree & Download button and the file NVIDIA-Linux-x86_64-280.13.run will be saved ( I use 64 bit ). The NVIDIA graphics driver uses a Unified Driver Architecture: the single graphics driver supports all modern NVIDIA GPUs.
A complete list for all the Unix Drivers is on this page : http://www.nvidia.com/object/unix.html
The NVIDIA graphics driver is bundled in a self-extracting package. You can extract it with :
sh NVIDIA-Linux-x86_64-280.13.run --extract-only
Verifying archive integrity... OK Uncompressing NVIDIA Accelerated Graphics Driver for Linux-x86_64 280.13..............................................................................................................................................
A folder NVIDIA-Linux-x86_64-280.13 is created containing the uncompressed contents of the .run file. On Linux-x86_64, that file contains both the 64-bit driver binaries as well as 32-bit compatibility driver binaries.
Documentation can be found in :
NVIDIA-Linux-x86_64-280.13/html/index.html and
NVIDIA-Linux-x86_64-280.13/README.txt
To be able to install the driver we need first :
apt-get install build-essential linux-headers-$(uname -r )
Before attempting to install the NVIDIA driver you should first disable Nouveau. Nouveau ( http://nouveau.freedesktop.org/wiki/ ) is a display driver for Nvidia GPUs, developed as an open-source project through reverse-engineering of the Nvidia driver. Nouveau performs modesets in the kernel. This can make disabling Nouveau difficult, as the kernel modeset is used to display a framebuffer console, which means that Nouveau will be in use even if X is not running. As long as Nouveau is in use, its kernel module ( nouveau.ko ) cannot be unloaded, which will prevent the Nvidia kernel module from loading. It is therefore important to make sure that Nouveau's kernel modesetting is disabled before installing the Nvidia driver. ( see the README.txt ).
To avoid problems later I start with :
apt-get purge xserver-xorg-video-nouveau
and reboot.
After rebooting do not login and switch to the first virtual (not graphic) terminal by :
Ctrl+Alt+F1
login as root, just enter : root and enter root's password.
Stop the X server by : /etc/init.d/gdm3 stop
Navigate to where you downloaded the driver :
cd /home/$USER/Downloads
sh NV*.run
The .run file is a self-extracting archive. When executed, it extracts the
contents of the archive and runs the contained nvidia-installer utility,
which provides an interactive interface to walk you through the installation.
nvidia-installer will also install itself to /usr/bin/nvidia-installer,
which may be used at some later time to uninstall drivers, auto-download
updated drivers, etc.
Just hit Tab and Enter to accept the license....
Say Yes to :
Install NVIDIA's 32 - bit compatibility OpenGL libraries ? if you run amd64.
Say Yes to :
Would you like to run the nvidia-xconfig utility to automatically update your X configuration file so that the NVIDIA X driver will be used when you restart X ? Any pre-existing X configuration file will be backed up.
A logfile can be found here : /var/log/nvidia-installer.log
The nvidia-installer will also write a file nvidia-installer-disable-nouveau.conf ( /etc/modprobe.d/nvidia-installer-disable-nouveau.conf ) containing these lines :
# generated by nvidia-installer
blacklist nouveau
options nouveau modeset=0
Start the X server again :
/etc/init.d/gdm3 start
Login and check that the nvidia driver is running :
glxinfo | grep rendering
direct rendering: Yes
You can access nvidia-settings in the menu : System > Preferences > NVIDIA X Server Settings that allows adjustment of several additional settings.
For the settings to be loaded on login add :
nvidia-settings --load-config-only
to Startup Applications : System > Preferences > Startup Applications
If this doesn't work make sure you have unchecked Include X Display Names in the Config File in NVIDIA X Server Settings at nvidia-settings Configuration.
Notes :
(1) At the installation you can get a warning like :
No precompiled kernel interface was found to match your kernel; would you like the installer to attempt to download a kernel interface for your kernel from the NVIDIA ftp site (ftp://download.nvidia.com)?
Just answer No and continue.....
or
the installer complains that the gcc version is different from what was used to compile the kernel...
If you know what you are doing and want to ignore the gcc version check, select "No" to continue installation. Otherwise, select "Yes" to abort installation, set the CC environment variable to the name of the compiler used to compile your kernel, and restart installation.
Answer No, but if it fails you can temporarily set the gcc version (to 4.3 for example) by:
export CC=gcc-4.3
before running the Nvidia installer file.
(2) Any kernel update or xserver-xorg-core update will force you to reinstall the driver.
Just use one of the advanced options of the nvidia-installer ( /usr/bin/nvidia-installer ) :
Ctrl+Alt+F1
login as root, just enter : root and enter root's password.
/etc/init.d/gdm3 stop
nvidia-installer --update
If there is a more recent driver available, it will be automatically downloaded and installed.
See also : http://forums.debian.net/viewtopic.php?f=16&t=56833
To see the advanced options of the nvidia-installer just run in a terminal :
nvidia-installer -A
You can always check the current install status to see if it needs to be re-installed:
as root run :
nvidia-installer --sanity
Press OK :
To install the driver for another kernel without uninstalling the driver for the current kernel just boot into the other kernel and install the driver with :
nvidia-installer -K ( K = --kernel-module-only ) :
Install a kernel module only, and do not uninstall the existing driver. This is intended to be used to install kernel modules for additional kernels (in cases where you might boot between several different kernels). To use this option, you must already have a driver installed, and the version of the installed driver must match the version of this kernel module.
Sunday, August 28, 2011
Lost Blinking Cursor In Google Search Page
Just noticed this annoyance this morning. After hitting the Home button in any browser to go to google.com I had to click in the search field to activate it and have a blinking cursor back.....
At first I thought it was related to flash : http://www.mydigitallife.info/mouse-pointer-flickers-blinks-or-disappears-in-web-browser-ie-firefox-google-chrome/, but this was not the case.
It seems recently the basic Google search page has been changed. A workaround to the cursor problem was very simple :
Select Options in the upper right corner and then Search settings :
Scroll down to Google Instant and change setting to Do not use Google Instant :
Another workaround can be : bookmark http://www.google.com/webhp?complete=0 for searching, or set it as your browser home page.
At first I thought it was related to flash : http://www.mydigitallife.info/mouse-pointer-flickers-blinks-or-disappears-in-web-browser-ie-firefox-google-chrome/, but this was not the case.
It seems recently the basic Google search page has been changed. A workaround to the cursor problem was very simple :
Select Options in the upper right corner and then Search settings :
Scroll down to Google Instant and change setting to Do not use Google Instant :
Another workaround can be : bookmark http://www.google.com/webhp?complete=0 for searching, or set it as your browser home page.
Saturday, August 27, 2011
Mintmenu In Debian
If you like to install Linux Mint’s rather slick menu do the following :
Go to this page : http://packages.linuxmint.com/list.php?release=Debian#main.
Download the following packages :
mintmenu_5.2.2_all.deb
mint-common_1.0.5_all.deb
mint-translations_2011.08.06_all.deb
Navigate to where you downloaded the packages :
cd ~/Downloads
and then as root :
dpkg -i *.deb
You may see the following :
dpkg: dependency problems prevent configuration of mintmenu:
mintmenu depends on deskbar-applet; however:
Package deskbar-applet is not installed.
dpkg: error processing mintmenu (--install):
dependency problems - leaving unconfigured
Setting up mint-translations (2011.08.06) ...
Setting up mint-common (1.0.5) ...
Errors were encountered while processing:
mintmenu
The package that seems to be missing was deskbar-applet...
apt-get install deskbar-applet
Right-click gnome-panel > Add to Panel...and choose mintMenu ( Advanced Gnome Menu )
You may encounter some problems ( like I did ) :
In this case you are missing python-xdg, so :
apt-get install python-xdg
Next problem was that the Places menu ( except for Computer in my case ) did not work. So when clicking on Home Folder nothing happens......Solution :
apt-get install xdg-utils
Now it works....
Right-clicking the Menu gives access to the following :
To change and edit your Favorites in the Mint Menu you can right-click to remove things you do not want and right-click on any application in the menu and check Show in my favorites.
Go to this page : http://packages.linuxmint.com/list.php?release=Debian#main.
Download the following packages :
mintmenu_5.2.2_all.deb
mint-common_1.0.5_all.deb
mint-translations_2011.08.06_all.deb
Navigate to where you downloaded the packages :
cd ~/Downloads
and then as root :
dpkg -i *.deb
You may see the following :
dpkg: dependency problems prevent configuration of mintmenu:
mintmenu depends on deskbar-applet; however:
Package deskbar-applet is not installed.
dpkg: error processing mintmenu (--install):
dependency problems - leaving unconfigured
Setting up mint-translations (2011.08.06) ...
Setting up mint-common (1.0.5) ...
Errors were encountered while processing:
mintmenu
The package that seems to be missing was deskbar-applet...
apt-get install deskbar-applet
Right-click gnome-panel > Add to Panel...and choose mintMenu ( Advanced Gnome Menu )
You may encounter some problems ( like I did ) :
In this case you are missing python-xdg, so :
apt-get install python-xdg
Next problem was that the Places menu ( except for Computer in my case ) did not work. So when clicking on Home Folder nothing happens......Solution :
apt-get install xdg-utils
Now it works....
Right-clicking the Menu gives access to the following :
To change and edit your Favorites in the Mint Menu you can right-click to remove things you do not want and right-click on any application in the menu and check Show in my favorites.
Friday, August 26, 2011
March Of The Penguin : 20 Years Of Linux
20 Years ago Linus Torvalds announced on a Web bulletin board that he'd begun working on a free computer operating system. In that message, Torvalds described Linux as just a hobby, won't be big and professional.
Now, two decades later - whether you're aware of it or not - Linux is practically everywhere.
It has become an essential part of the computing world, where it quietly powers many of the modern innovations we take for granted. You can't even fly on an airplane ... you can't use Facebook, you can't buy a book from Amazon, without running into Linux.
http://www.linuxfoundation.org/20th/
http://www.facebook.com/TheLinuxFoundation
Now, two decades later - whether you're aware of it or not - Linux is practically everywhere.
It has become an essential part of the computing world, where it quietly powers many of the modern innovations we take for granted. You can't even fly on an airplane ... you can't use Facebook, you can't buy a book from Amazon, without running into Linux.
http://www.linuxfoundation.org/20th/
http://www.facebook.com/TheLinuxFoundation
Subscribe to:
Posts (Atom)